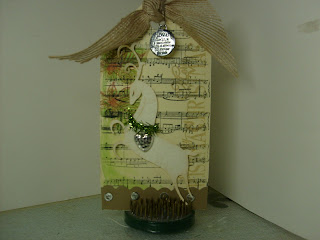
Tim's Tag #2
I finished Tim's tag yesterday. When I was finishing up writing my post my electricity went out and I lost the tutorial I had written. I didn't have time to rewrite last night, so today here is tag number #2
I loved the second tag as much as the first. If I manage to get all 12 tags done. I want to put them on a tray I bought many months ago. I will hang it proudly in my new craft room.
Once again I didn't have the supplies he used. Here is how I made my Tim tag my way.
I cut the tag at 6 inched from Joy of the Season cart. That is where I also got my sweet reindeer, cut at 4 inches( i used the flip button). I used embossed paper and inked around the deer before I took it off the mat (see pic).
I used a music note stamp for the back ground. I just bought this stamp at Micheal's last week. You could also use music paper for the back ground. I found a few old piano books at thrift store's. I tear pages out of them for this type of project. They distress very well. I used a smaller Merry Christmas stamp along the side. I stamped it twice in brown ink. The leaves on the top left I just used a generic leaf stamp. If you look at his tag the leaf outline is very light. Then I colored it in with colored pencils and chalk to give it the distressed look.
I used some twine ribbon I had instead of burlap. I used a silver charm saying love for the charm to hang from the ribbon. I used stazOn Ink around the charm to give it some age. I placed a sticky back metal dot to the top of my pin. It covered the head of the pin. I didn't have a star for my deer. I used a heart instead. The tinsel I have around his neck I got at Walmart in thier Christmas area. I got 7 different colors. They had then for 1.29 each. I have plans to use them to make Christmas cards. It was a bit to wide for this project but all I did was trim it down on one side.
I used a Friskers edge punch for the bottom and added some sticky back metal dots I distressed.
Now on the tag #3!!
Happy Crafting
'Thanks for stopping by
Terri


I am inspired by these tags and will try to duplicate them. Thanks for doing more of them.
ReplyDeleteWow I learned something new and what a duh moment why didn't I think to ink before taking off the mat that's a great idea! Your doing a fine job Terri on the tags
ReplyDelete