I have been Published

I will have Two cards in the

July 2011 Issue

Also Three cards in the

Sept/Oct 2011 Issue

The Bug Magazine


Search This Blog

Monday, December 24, 2012

Needle Felting Projects In The Works

Merry Christmas Eve everyone. I pray  you all are safe and enjoying a great time with your family. We will be heading to church soon to celebrate the birth of our Lord. This is a precious time at my house.


I have been busy with work and christmas  but I have also been playng....
working on my needle felting projects. I have one wall hanging about ready to be machine needle felted.  My machine will be deliver on Thursday. I cant wait to get that machine  up and running!
Here is my first project.  Im doing a wall hanging. I love the vibrant colors against the black. It is just tacked down for the moment. There will be a few changes but over all I like the color combination and the placements. I plan to add a few more leaves and add some more dimension.


 I likened my wall hanging to a quilt I saw on Pinterest.
Here is a picture of the  original quilt. She sells the pattern for the quilt. If your interested, I have included her link. She has alot of wonderful designs on her web site and blog. I loved them all. I used sizzix dies to make my wall hanging.
Oh my!http://www.materialobsession.com.au/epages/mama12093.sf/en_AU/?ObjectPath=/Shops/mama12093/Products/%22Hooterville%20-%20Pattern%22

Here a few more things I want to use for  practice. I'm sure there will be a learning curve. So I have several things ready to play with before I touch my wall hanging with the needle felting machine.
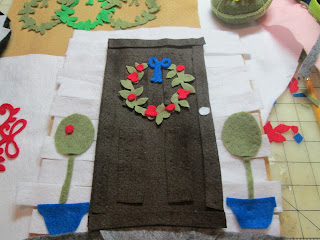
felt door

bird and vines

wreaths

Bird.
 I hope to use this in a wool needle felted quilt. I have every big plans for me and my new obsession!
Merry Christmas!
Happy Crafting in 2012
Terri

Thursday, December 20, 2012

Merry Christmas!!!!


I wanted to stop in and show you my favorite pic from Christmas 2012. I know what your thinking but Christmas is still a few days away. But we had to open our presents early since my grand daughter is going out of town to spend time with her dad tomorrow. See my post yesterday and you will see I got my christmas present early too. And I loved it.

Kimmie had a great Christmas too. She had tons of presents under the tree. Barbies, barbies and more barbies, a Kindle, tons of girls stuff and one present way in the back that took her by complete surprise.


 All summer long she has asked for a mermaid tail. Not just any mermaid tail but an actual working mermaid tail. Where does one buy a mermaid tail??? I hadden a clue....So I made her one. This is the  happiness I have ever seen this 6 year old.


 Christmas is so magical when your 6. And really magical when your a Grandma.
Have the best Christmas ever!!! I am so blessed.
Terri

I Am So Blessed

I am off for the Christmas Holiday. I will return to blogging after the New year. Have a Merry Christmas and a Happy New Year

I just had to pop in and tell you about my fantastic week!!!
It has been very busy this past week in my world. My daughter got baptized. Our whole family is so happy for her. My grand daughter had her first Christmas recital. She played a great Christmas bear.
                                            Then.................
I was  gifted a wonderful Christmas present from an equally wonderful freind. He gave me a Janome 725 Felting machine.


my new toy!


I will be posting all about my new toy. Once I get a project made I will make a nice long post about it.

Do you have a needle felting machine? or do you felt with a single needle? Id love to hear from you. Where do you buy your supplies? What's a good outlet for wool?

I'm excited and cant wait to learn all about my new toy. I hope you will enjoy learning along wth me.
  Thank you, Thank you  to my special friend. I can not find the words to tell you how touched I am by your generosity. I was not surprised by your kindness tho, just amazed that I am so blessed to have a friend like you. I must have been very good this year.  Thank you OD

Tuesday, December 4, 2012

New Years 2013 Card


Happy New Year 2013
Looks like its that time again. Time to welcome in a new exciting year! It's also time for me to be the designer for the CAD blog. If you came over from CAD to see the card I designed today.... Thank you! I hope you make  a few of these for yourself and  the ones you love.
 
 We all are expecting an exciting new year in 2013. This card would be a good way to let someone
know your ready to welcome the new year in with great joy.
 
Here's  how I made this card.
 
I used some blue mirror paper for my front mat.  Then I cut my martini glass and the word cheers from the cricut cart,  Designers Calendar.  The glass and cheers come as one cut from this cart. This is an oldie but a goodie cart. There are so many great cuts on this cart.
 
I cut the glass/cheers twice. Once in the grey card stock  at 4.50" and again in red glitter paper. I cut away the "glass" and glued the glittered "cheers " on top of the grey "cheers". I used a green marker to color in my olives.  I used some foam tape to pop up the cheers/glass. The  2013 was also cut from the same red glitter paper. I used a Tim Holts die to cut the numbers. They are about 1.5 "
 
The balloons were cut from The Hoot and Holler cart. I cut the balloons at  3". I  cut away the tail's that were on the balloons.  I used some acetate strips to hold up my balloons, inside my pop up. I wanted to see the tops of the balloon's while the card was closed. So I made the strips long enough to be seen at the top of my card. If you don't want your balloons to be seen before the card is open. Simply place the pop up lower inside your card.
 
Nowon to the inside
 

I have used a small pop up inside my card to hold my balloons. This is very easy to make and  then glue inside your card.

 
Fold your card stock (used same color as your card base. I used red here to show you how it will look). Cut the corner off. I used the measurements of 2.5 across the top and 3.5 down the spine. I scored the corner and glued it inside my card. I then cut strips of acetate and glued on the inside of the pop up. I glued my balloons to the acetate. I glued balloons to both sides of the acetate strips.
 Thank you for stopping by. If you have any questions please email me. Sugarlite02@aol.com

If you haven't been over to the CAD blog. Please stop by there. On the CAD blog we post a new cart everyday 365 a year. There is always  some wonderful inspiration waiting for you.
www.cardaday.blogspot.com
Happy Crafting in 2012
Terri

Saturday, December 1, 2012

Flat Needle Felting

Hello Everyone. Today I have a video for you showing how I made this incredibly easy pillow from Craft Felt. As you know flat needle felting is my latest obsession. I have made 5 pillows using this idea and I have loved every one of them! Enjoy the video.
Happy Carfting in 2012
Terri

Thursday, November 29, 2012

I have a new love....Needle Felting

Hello everyone! I am back from my mini vacation. I had a great time but I am glad to be back in the swing of things. I start a new job on Monday. I am excited about that. I will no longer be a Rep for Hallmark Cards but I will be a Rep for American Greeting Cards. I'm sure it wont be much different but I'm excited about the change. Of course I'm still teaching classes at Joann's. That is always fun.
Here's what i want to talk about today....Needle felting

 I have been very busy but not with card making. I have a new love.. called Needle Felting. I discovered this craft while I was on my mini vacation. I LOVE IT!!! I had never heard of this craft. While I was on vacation I was hanging out at Joanns on a Saturday and they ask me if I wanted to play with a Felting Machine. I had never heard of this "sewing machine" type machine that was only for felting wool. I had  a blast playing with it.
This machine has 5 needles that only go up and down. It pushes the fiber from the felt into other felt or wool. This will hold the two fibers together. The needles have barbs on 3 sides that help grab the tiny fibers and mesh the fibers from one piece of felt to the other. You can attach felt, fibers, yarns or wool together.

I was heart broken to find the machine was over $300.00. So I would have to settle for the single needle felting. Oh my, I loved that even more. This craft was made for me. I love the look and feel of wool. One of my first videos was on making felt roses. I had no idea this wonderful craft was waiting for me to find it.
Instead of a $300 machine I got the following supplies


foam $5

Needles $7
Roving $7 for a combination bundle.


5 needle punch  $12

And I got some craft felt at 4/$1.00
That's what I started with. Most of that I got with a 40% coupon at Joann's, Hobby Lobby and Micheal's.
I have made several things the past week. I plan to make a few short videos and post them here on my blog. I should have one posted tomorrow. I have made very simple projects, since i am just learning.


 But here are some wonderful things I hope to learn to make.


Yes thats a felted cat!!!
 
Here is a book I started with
Im sure I will start with the basics. Such as the pillow I made.
 
See you tomorrow with my video of Needle Felting
Happy Crafting in 2012
Terri
 

Wednesday, November 28, 2012

Christmas Thank you Card

Hello Card Makers!! Welcome to my blog. Today I have a card for you that I designed for the CAD blog. It is a Thank you card for all the wonderful gifts and good deeds that came your way this Holiday season.

I made a video showing you how I used a cut from an Imagine cartridge using my expression machine.


 Enjoy the video
Happy Crafting in 2012

Wednesday, November 21, 2012

Im on vacation!!! and in the middle of a Job change

Sorry I have been missing in action. I am on vacation and in the middle of changing jobs. It has been a very busy 2 weeks. I will be back next week and I have lots if fun things planned. Thank you for your patience.

Today I do have a card posted over on the CAD blog. I did not have time to make another post here on Ramblings.
If you want to see the card please stop by the CAD blog where I am the designer today. http://www.cardadayblog.blogspot.com
Thank you and have a great Thanksgiving!!!!

Here is the Happy Hanukkah spinner card I made for the CAD blog
Sorry the picture is so bad. My camera got stolen and I'm using my phone camera. GRRRRRR I hate that. My son doesn't want me to replace my camera because he has one for me for Christmas. He has hinted he may give it to me at Thanksgiving!! Oh I hope sooooooooo. If he does I will make a video very soonnnnn.  Either way I will be back home and posting very soon. Thank you for stopping by today!
Happy Crafting in 2012

Wednesday, November 14, 2012

Ornament Family Christmas Card

Hello Card Markers.  Welcome to my blog!

Thanks for stopping by today. I am the designer over on the CAD blog today. Today's theme is Ornaments.

 I made an ornament family today on the front of my card. I used some bling to give my ornamant family some personality. I hope you like this card. I think its a adorable.


 I used some red vellium to make the ornaments.  I poped them up with some foam tape. Because I used vellium you can see the tape behind the ornament.  If that bugs you, use red designer paper instead.  They will be just as cute.
The ornaments came from an Imagine cart I got on sale a month or so ago. I dont have an Imagine but the Cricut Expression will cut out the basic shapes from Imagine carts.

 The dad and the mom were cut at 4 inches, the baby was cut at 2. I used a die cut I have with my Fuse to cut the green base. It is a wavey square. I turned it on its side to give me the diamond shape. The paper on the inside is from my stash. The ornaments were already stamped on the inside. The Merry Christmas stamp is also from my stash.

I added some bling to the ornments from my stash. I think this gives them
personality. The crown came from a small punch I got at Walmart.
This card would be adorable using a different ornament for each person in your family. That's the great thing about the Cricut you can make these ornaments different sizes to fit your family.
 
Thank you so much for stopping by. I hope you enjoy making this card as much as I did.
 
Happy Crafting in 2012
Terri
 

Wednesday, November 7, 2012


Hello Card Markers!!!
Welcome to my ramblings!! If you came from the CADblog, Im so happy you stopped by. I have made a 4x4 inch Gift Card holder card. I know I have plans to give out a few gift cards this year. So I am happy to have a simple but adorable card to make. This card is made from one 4x12 inch piece of card stock. Here are the directions. I would have made a video but my camera was stolen this week. So I had to make due with an old camera I had to take still pictures. The pics aren't great but I think you can easily follow how this card is made. I got my original card from a video I saw on Youtube many years ago. Here is the link, you can watch Jennifers video on youtube.

http://www.youtube.com/watch?v=8FXoDtw6WCE&list=FLre6iweHPZPIiJVmaMYkOKw&feature=mh_lolz

If you don't want to watch the video here are the written instructions
Take a 4 x12 inch card stock and score it 4 inches from each end

fold the middle 4 inch section into a valley fold

with an exacto knife cut a slit in the fold to hold the card

add glue only where it is marked with the black marker

fold the inside together and make sure your card will fit
Now you can decorate the outside and the inside.
I used the Tim Holts small ornament to decorate the front

I used this Spellbinder die for the outside and one for the inside

I used this LOVE inside the ornament.
I also used an embossing folder and a Martha Steward foliage punch to decorate my Christmas ornament. The samll rose was from my stash.


Thank you so much for  stopping by my blog. I hope you enjoy making this cute card.
If I can help you in any way make this card just email me
Sugarlite02@aol.com

Happy Crafting in 2012
Terri