I have been Published

I will have Two cards in the

July 2011 Issue

Also Three cards in the

Sept/Oct 2011 Issue

The Bug Magazine


Search This Blog

Wednesday, February 29, 2012

Thank you

Here is a simple Thank you card. I made this card with the Flower Shoppe cart. It is an A-2 card with the top right corner rounded. I cut the flowers at 2.5 inches. I am not sure where I got the leaves from. I did this card a month ago and have wanted to post it ..........but just couldn't remember where I got the leaves. The white card stock was ran through the Cuddle bug with a small flower folder. I cut a rectangle banner and notched the ends. I used a stamp from my stash as the Thank you.
If I figure out the leaves I will repost it!!Sorry. 
Happy Crafting  in 2012

Thursday, February 23, 2012

Bird Shadowbox


Hello Everyone
   Today I have a project I just finished and I love it!!!. I saw a  white shadowbox on Pinterest and couldn't wait to make it for myself. All you need is a 5x7 shadow box and a candle stick holder. I got mine at the thrift store. The tag on the back of the tub shadow box said it was from 1986 and  from Montgomery Wards.  I also got the candle stick at the same time. Total cost of both $1.00.  I wanted a wooden candle holder but couldn't locate one there. So I got a brass one and it works just great.  I saved the tub.. you never know when I might use it!

I glued the two pieces together than  sanded and painted everything white. Then I went over the painted surface with gray glaze and wiped the glaze off. The inside as well. This gives the box great patina.

I got the eggs for my nest at the Dollar Tree. They were in the Easter decoration dept. I painted the wooden eggs blue and spackled them with brown paint. I made the nest from a handful of moss I already had. I got the small white bird from my stash as well. Once I found the right size branch from my yard, I glued the bird to it. Then placed that inside the frame. The crown on the birds head is top off a plastic Christmas ornament. I hot glued the crown to my birds head. I used hot glue for everything!

I used some scrapbook paper with printing on it to cover the back board. Above the bird I glued a small croched flower to the back board. I used a very small  safety pin to hang a heart charm. I had the  metal butterfly in my stash.
 I placed my Bird Shadow Box on my Entry Table. Along with my Bunnies.
Not bad  for a few dollars and an hour of my time!
Here is the link to where I first saw the Shadow box. http://allthingzrelated.blogspot.com/2010/03/nest-for-my-nest.html
Be sure and check out all of her blog. I loved everything she does!!!
 
Thanks for stopping by
Happy Crafting in 2012
Terri

Wednesday, February 22, 2012

K and Co part 2 (plus bloopers)

Hello Everyone!


Today I have the second video on the K and Co die cut cards. I will warn you before you watch the next 20 minutes. There are some bloopers on this video. One card didn't turn out to well. BUT I couldn't redo it because I didn't have anymore product to make a new card. So you get to see my big mistake and how I tired to fix it. I should have stopped and only made a few cards per video. Of course I wasn't paying any attention to the time and this video is 20 minutes long. Sorry about that. I do have 2 cards left to do in this series. I hope this video doesn't chase you off and you will come back to see the other cards. Trust me these aren't the first cards not to turn out as plans just the first I'm willing to show you. I hope you get something from this video.

Thanks for stopping by

Happy Crafting in 2012

Terri
click here if video isnt showing      http://www.youtube.com/watch?v=HfzVVBL5W04

Sunday, February 19, 2012

Best Wishes-- Wedding Card


Hello Everyone!I am excited to bring you a 5x5 square wedding card. This is a simple card  I know you will enjoy making. I used 2 cricut cartridges, cuddle bug folders, a sticker and some bling.
My Directions
     I used the Cricut cart Holiday Cake ( MS) to cut the Best Wishes at 1 1/4. The cake was made with 3 rectangles. I ran them through 3 cuddle bug folders, then rounded the top corners. The rectangle's are 2 1/2 & 2 & 1 1/2 inches long by 1/2 wide.
     I had to make a cake plate since I didn't have a cart with one on it. So I used the Sentimental cart and a Fiskars scalloped punch. Here is a picture of the pen I cut from Sentimental ( at 3.5) and cut down to add to the scalloped edge to make the plate. The picture below will show you were to cut the pen to make a plate pedestal. Then glue the scalloped edge on top to make the plate. Once the plate is made add your cake. I put the cake layers on with foam tape. I then added two bling hearts to the top of the cake. The hearts with the arrow was a left over valentine sticker.


Thank you for stopping by my blog. If you came from the Card A Day blog...
         Welcome to my blog!!!!
    Please stop by again. Monday I will be continuing the series I am doing with K and Co die cuts. Scroll down and you will find the video I did a few days ago explaining the new series on my blog. You can also find me on Youtube under the name Sugarlite02

Happy Crafting in 2012
Terri


Friday, February 17, 2012

K and Co Diecut Card Series


Hello Everyone!
I am starting a short series using the K and Co die cut packages. Here are the first 3 cards I made. I got my diecut package at Joann's for $3.50. I hope to make 10 cards from this package of die cuts. Its a fast and easy way to make a great card. Here is the first video of the series.

 I hope you enjoy it and get some ideas.
Thanks for stopping by
Happy Crafting in 2012

Wednesday, February 15, 2012

Kiss Me.... A Napkin Card


Hello Everyone! 

Today its my turn over at the Card A Day Blog    http://cardadayblog.blogspot.com/
If you came from there Thank you !!!
    
 Today I made a St Patty Day card. It is my first to ever make. I found these wonderful paper napkins that had puckering lips all over them. I wanted to use them for a Valentine day card. However the thought occurred to me to use them for St Pattys day instead. I had an adorable small lip stamp. I thought they would be great together.


What I love about these small packages of napkins is the scale of the print. The print is so much smaller than a regular size napkin print.  Making them ideal to use in a card. I got my napkins at Walmart  over in the party goods sections. They were hanging  at the end of an isle. The package was $1.00. I have had the lip stamp for many years. I have no idea the maker.


Here is the video I did last year showing how use a napkin and cling wrap to make a card.
If you have any questions please contact me
Sugarlite02@aol.com

Thank you again for stopping by
Happy Crafting in 2012
Terri


Monday, February 13, 2012

Using what I already had


Today I have a simple card I made using a note pad. I got this package of note pads from Dollar General for the calendars. I wanted to make a few flip calendars. The note pad was just a bonus for my buck. I loved the chicken on the note pad. I wanted to use it some how in a card. This is what I came up with. I used a cross stamp I had and a sentiment stamp. I added a black button. And it was done. I love the card.
                                                      Here is the pad of notes and calendars.
 I have a few cards that I am working on from the K and Co die cut packages. I hope to get them posted this week. I am in the final stretch of our busy season at work. After March 1st I will go back to my  so called part time job. This week they have me scheduled 54 hours. Hmm doesn't sound to part time to me. So I will be glad when our  "season" is over and things slow down. I will then be working 4 days week at about 10-15 hours per week. I like the sound of that. I have been going 100 miles an hour since Thanksgiving. So bring on the slow season!! Im ready for a break.
Have a great Monday.
Happy Crafting in 2012
Terri

Saturday, February 11, 2012

2012 Calendar.. A great use for left over Supplies

Hello Everyone!!
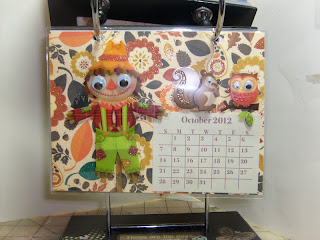
Today this post is heavy with pics. I have a flip  2012 calendar I made for an auction at our Church. I bought a flip photo frame from the thrift store. I repainted the base and added my calendar pages. I hope you make one for your desk. They are so so much fun to make and to enjoy all through the year. They also make great presents. I used a variety of  pattern papers, stickers, diecuts and stamps from my stash. Nothing was bought just to make this calendar. Its great way to use your left over supplies. I got the calenders from a Calendar Notepad from Dollar General. It came with 4 pages of each month and a note pad. Monday you will see a card I made with the Chicken note pad.
  All that for just a $1.00. It was the prefect size for this 4x6 calendar. You can also print a calendar from online. Just google calendars.

Here are the pics of my calendar - I'm Sorry.... for some reason Blogger posted the pics out of order and will not let me correct it without reposting. No time to repost..so please  enjoy!!!
Happy Crafting in 2012
Terri


Friday, February 10, 2012

Honeycomb Heart Card

I have a secret.... Not really!! If you know me than you know I LOVE honeycomb paper. Its no secret.

 So when I saw these wonderful small hearts made with honeycomb paper. I couldn't wait to find a way to use them in a card.
 They were made to be used as a pick for Valentine cupcakes. I found my heart picks in the Valentine decoration section at Walmart. These were not in the cake decoration section.


This is the card I came up with.


I also used ribbon and a paper doilie on the front of the card. I then added a stack of felt hearts. These were some I bought in a package of felt hearts.  Inside the card I used a paper doilie and 3 of the honeycomb hearts. I cut the letters from the Story book cart at 2 1/4 inches.


After I removed the plastic pick. I glued the hearts to the middle of my card.


I got these doilies at Dollar General.
Thanks for stopping by.
Happy Crafting in 1012
Terri

Thursday, February 9, 2012

Sweet 16 Invitation Card

Hello Everyone!!
Today is my turn to showcase a card on the Card a day Blog (http://cardadayblog.blogspot.com/) If you came from the  CADB                        Welcome!!
  I'm so glad you stopped by. Please leave me a comment if you like what I have done here. Id love it if you would join my little blog!!
  I have an invitation card for you today. It is a Sweet 16 party invitation. What fun this would be to surprise a sweetheart with a party and a new car on her 16th birthday. I didn't have fun parents when I was 16. They believed I needed to be responsible and earn my first car!! And so I did. However today I drive a red VW Beetle with black 6 inch dots all over her. She is my very own Ladybug. Ive added a pic of my ladybug below.


The sign in the back window says BUGALICIOUS. I have had this car, like this since 2002

I hope this invitation card gives you a great idea for your next party. Maybe it will bring back great memories of your first car too.
Happy Crafting in 2012
Terri
 Here's the simple how to.....
 I cut my Beetle at 4 1/2 inches from the Everyday Paper Doll Cart
I wanted my bug to open the other way so you can either use the flip key on your Cricut or do as I did and just turn it over facing the opposite direction.
Then I traced the outline of the bug onto vellum paper and cut it out. This way once you add the yellow bug on top to make the card. The vellum looks like windows.
To make the card I glued the very end of the card stock and the vellum (what looks like a bumper) together.
I then folded that part over to make a scoreline. I know its hard to see in this picture. When you make your card you will see the Cricut already gave to a score line there on the bumper part. So it will be easy for you to see where to fold  the card over.
I cut a rectangle piece of card stock to cover the inside. Make sure you cant see that rectangle from the front.
I stamped the invite information to the card stock and glued it inside the card.
I added some flowers made with glitter paper and a flower punch. The " banner" was hung from hemp cord that I glued to the card stock and trimmed off. I used some stickers I had to make the sweet sixteen banner. Then I added a bow on top.

Tuesday, February 7, 2012

Thank you Card

So good to be home, Thank you all for your kind words and your prayers for my grand daughter Kimberlee. She is going just wonderful. Yesterday was her first day back to school. Her teacher reports she had a great day!!
So now back to where we were before the crisis.
                                 Card Making !!!


Here is a card I made for a friend who was so kind to take care of my dogs and my cat while I was away. I used some diecuts from K and Company and a bird house I cut with my Cricut. The ribbon, buttons, flowers and pins are all from my stash.


The inside of the card
I want to do a series of card's from the K and Co diecut  package.There are so many wonderful cut outs from this package. I noticed K and Co has several die cut packages that would make great cards. They are inexpensive.Their cutouts have great color and size. Added with a few cuts from the Cricut or a stamp or two. You have a great card!
   I have a invitation card coming on the Card a Day Blog  on Thursday. Then I plan to start the series of  the K and Co die cut cards.
I hope you will join me for a few cute and fast cards.
Thanks for stopping by
Happy Crafting in 2012
Terri

Monday, February 6, 2012

We have a winner folks

Random .org choose number 24 from the 34 comments I had on my blog.
                    Congrats!!!!!!!!!!!!
                    Cathy (Happyscrapin)
Please email me your address and I will get your 2 stamp sets out in the mail.
Thank you everyone for making this blog hop a success  and so much fun!

Saturday, February 4, 2012

Masculine Card Blog Hop

Welcome to My first Blog hop. This is the first time I have participated on a blog hop. I am excited for you to blog hop along our list of wonderful blogs from the Card A Day Blog. I have some blog candy for you to win also. Leave me a comment on my blog. Letting me know you were here and I will pick one for my blog candy prize. Also there is a prize over at the Card A Day Blog for one lucky winner.
Lets see my card.                           
                          I made a Spinner Football card.


I cut the football and the goal post from Everyday Paper Dolls at 6 inches. I cut the bottom of the goal post off to fit my A-2 card. Then I wrapped the post with red and white yarn. The football was cut twice. I sandwiched a few inches of twine between the two footballs.Then taped it to the inside of my card. I placed a second piece of card stock (cut the same size as the card  front ) over the taped twine. That way you can twist the twine football before placing the card in the envelope. When your card is opened the football will spin. The medallion was cut from Tim Holts medallion die. I used a stamp from my stash and placed on top of the medallion.
BLOG CANDY!!!!!
I have two stamp sets for you.
One is from Hampton Arts and it is the cutest Owl set
The second is of a Vintage Alphabet set done in  Sign Language.
Most of you may or may not know that I am hearing impaired. I wear hearing aids in both ears and have lost a large portion of my hearing. The stamp set shows you the hand jester for each letter of the alphabet and shows the letter that corresponds with the hand jester. I have a few cards coming in the near future using the same set. I hope you enjoy them too.
NOW FOR THE BLOG  HOP

It's BLOG HOP TIME!
The designers at Card a Day Blog are joining together to do a blog hop this weekend! The theme is Masculine cards! Let's not let the guys have all the fun on Super Bowl Sunday....let's get a little of our own fun in!
To join in....visit all the participating designers by visiting their sites, some are having prize give aways...so make sure you pop in! Make sure you comment on all the blogs too, because at the end of the weekend, they are going to send a list of all who commented on their blog, and we are going to do a grand prize drawing of all comments on each blog! Blog Hop Prize
So JOIN IN TODAY....comment on the main blog page, and visit the other hop pages and comment there too!

Thank you for stopping by.
 Happy Crafting in 2012
Terri